
Tether Display
is an application for convenient viewing of photos during tethering.View photos in real time on any number of devices such as computers, tablets and smartphones.
You can easily display the current photo while shooting on one device and the last few photos on another. You will enable people involved in the session to view and rate photos on devices within the local network (e.g. connected to the same Wi-Fi), and even share the preview via the Internet.
Dedicated remote control will allow you to control all the necessary functions of the Tether Display.
Features
- convenient, minimalistic interface with the most-needed elements
- viewing photos on any number of devices connected to the local network (e.g. Wi-Fi) or via Internet in a web browser
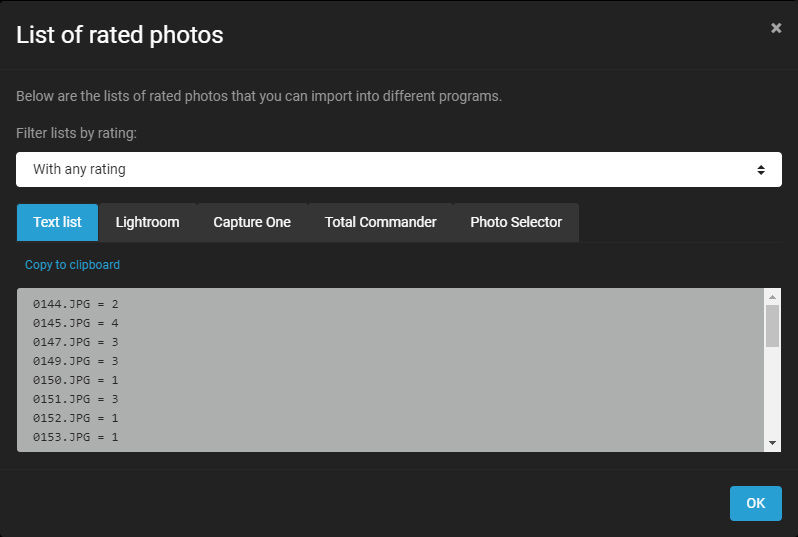
- rating photos on a scale of 0 to 5 stars with the option to export a list of rated photos to programs: Lightroom, Capture One, Total Commander, Galiomi
- single photo view displaying the current photo with a histogram and highlighted overexposed parts of the image
- multiple photos view showing the last few photos side by side
- thumbnails view displaying the photos as adjustable size thumbnails
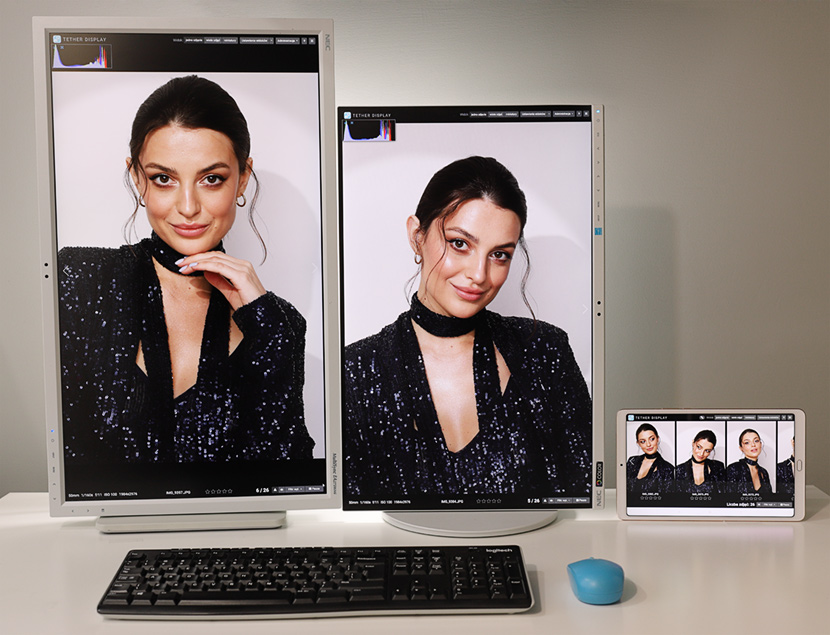
- support for multiple monitors or devices simultaneously with photo display synchronization (e.g. one monitor displays the current photo, the second monitor / device last few)
- the ability to display the selected photo on all devices simultaneously
- dedicated remote control that allows to control all the necessary functions of the Tether Display
How it works
Tether Display is built from two modules: application server and web application (webpage) for viewing photos.
The application server is part of the program that reads the photos from the photos directory and makes them available through the web application for viewing that can be opened in web browser.
Photo preview can be viewed on any device in the local network or, depending on the settings, even via the Internet.

System requirements
- PC with an Intel i5 processor at least fifth generation
- Windows 10/11 64bit
- a few GB of free disk space
- application to connect to the camera (EOS Utility, digiCamControl, airnef lub Imaging Edge depending on the camera model)
- any device with a web browser: computer, tablet, smartphone, smart TV and even a smart fridge 😀
- any operating system: macOS, Windows, Linux, Android, iOS
For the server application (where the camera is connected):
For viewing photos:
Installation
- Run the installation file TetherDisplay setup.exe
- Choose the installation language, read and accept the text of the license agreement.

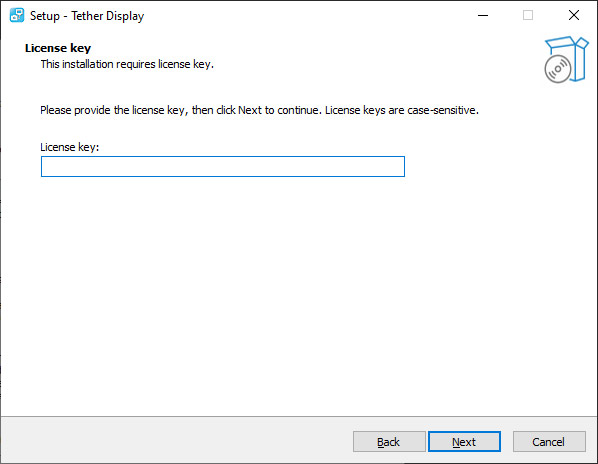
- Enter your license key key.
- In the installation folder selection step, select the directory on the disk with the appropriate free space and click Next.
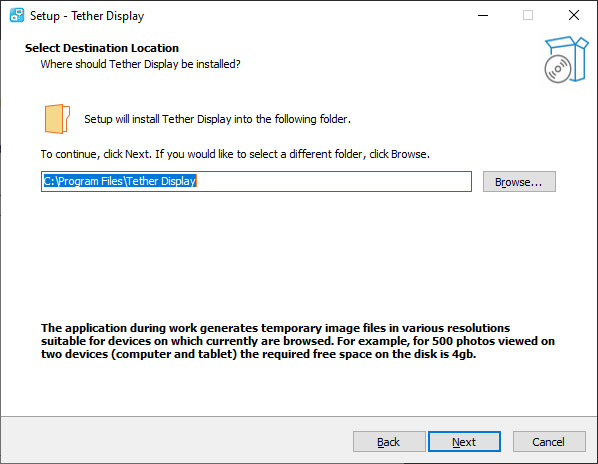
The application during work generates temporary image files in various resolutions suitable for devices on which currently are browsed. For example, for 500 photos viewed on two devices (computer and tablet) the required free space on the disk is 4GB.
- Tether Display has been installed. Shortcuts to start the application have been created in the start menu and on the desktop.
If you are using a different firewall than the standard Windows firewall, unblock these applications:
INSTALLATION_PATH\TetherDisplay.exe
INSTALLATION_PATH\svr\bin\TD_server.exe
Some antivirus may slow down the program performance. For high performance, add exceptions to your antivirus:
INSTALLATION_PATH\svr\app\tools\HistogramOverexposed.exe
INSTALLATION_PATH\svr\app\tools\vipsthumbnail.exe
INSTALLATION_PATH\svr\app\tools\vips.exe
Configuration and start-up of tethering
Tether Display requires an external program that transfers images from the camera to a computer.
The table below indicates which program is best to use depending on whether you want to connect the camera to a computer with a USB cable or wirelessly via Wi-Fi. All these programs are free.
Search your camera model by entering its name in the search camera... field, and then use the instructions for a specific program which you will find under the table.
If you can't find your camera in the table contact me, there will probably be a solution for tethering.
Canon EOS Utility 2
- Download and install the Canon EOS Utility 3 (this package also includes version 2) from this site: https://www.canon-europe.com/support/consumer_products/products/cameras/digital_slr/eos-r5.html?type=software&softwaredetailid=tcm:13-2021854
- Connect the camera to the computer with a USB cable. If your camera has built-in Wi-Fi support, you can connect to EOS Utility wirelessly. Check the camera manual to set up the connection.
- On the Canon camera, select the RAW + JPEG M (with lower quality symbol) saving format. Additionally, you can check in the manual of the camera how big photos your camera records for the JPEG M. option. If it is more than 12Mpix, choose the JPEG S option, which will reduce the resolution and the transfer to the computer will be faster.
- Start the EOS Utility and click Preferences...
- In the Basic Settings tab, uncheck Automatically display Quick Preview window field.
- In the Destination Folder tab in the Destination Folder field, enter the path of the directory where you want to save images and uncheck all other fields that are on this tab.
- In the Remote Shooting tab, check the boxes: Save also on the camera's memory card and In RAW+JPEG mode, only transfer JPEGs to the computer.
- In the Linked Software tab, in Software to link field select None.
- In the main program window, select Remote Shooting.
- Photo transfer has been configured, RAW and JPG files will be saved on the camera's memory card, but only the JPG files that are used by Tether Display will be copied to the computer, which will shorten the transfer time.
- If you want to use RAW files, you can enable their support. Check out the section: Application settings.
- Additionally, you can control your camera from this application and release the shutter.
Minimize EOS Utility window and go to the Starting the Tether Display section.
Canon EOS Utility 3
- Download and install the Canon EOS Utility 3 from this site: https://www.canon-europe.com/support/consumer_products/products/cameras/digital_slr/eos-r5.html?type=software&softwaredetailid=tcm:13-2021854
- Connect the camera to the computer with a USB cable. If your camera has built-in Wi-Fi support, you can connect to EOS Utility wirelessly. Check the camera manual to set up the connection.
- On the Canon camera, select the RAW + JPEG M (with lower quality symbol) saving format. Additionally, you can check in the manual of the camera how big photos your camera records for the JPEG M. option. If it is more than 12Mpix, choose the JPEG S option, which will reduce the resolution and the transfer to the computer will be faster.
- Start the EOS Utility and click Preferences...
- In the Basic Settings tab, uncheck Automatically display Quick Preview window field.
- In the Destination Folder tab in the Destination Folder field, enter the path of the directory where you want to save images and uncheck all other fields that are on this tab.
- In the Linked Software tab, in Software to link field select None.
- Confirm the settings by clicking the OK button.
- In the main program window, select Remote Shooting.
- In the newly opened window, click on the computer icon and check Computer and camera memory card field and In RAW+JPEG mode, only transfer JPEGs to the computer.
- Photo transfer has been configured, RAW and JPG files will be saved on the camera's memory card, but only the JPG files that are used by Tether Display will be copied to the computer, which will shorten the transfer time.
- If you want to use RAW files, you can enable their support. Check out the section: Application settings.
- Additionally, you can control your camera from this application and release the shutter.
Minimize EOS Utility window and go to the Starting the Tether Display section.
digiCamControl
- Download and install digiCamControl from this site: http://digicamcontrol.com/download
- Once launched, select File - Settings from the menu. In the Preview section, make sure that the Auto preview and Auto preview JPG only fields are unchecked and check Do not load thumbnails field.
- Go to the Session - Edit current session... menu. In the Folder field, enter the path of the directory where you want to save images and check the Download JPG file only and Use original file name given by the camera boxes.
- In the lower left corner of the main digiCamControl application window, select Tansfer: Save to PC and camera.
- Connect the camera to the computer. On the Nikon camera, select the NEF + JPEG basic saving format. Set the JPEG size to medium or small. Additionally, you can check in the manual of the camera how big photos your camera records for the JPEG M. option. If it is more than 12Mpix, choose the small option, which will reduce the resolution and the transfer to the computer will be faster.
- Take a test photo. The newly taken photo should after a while appear in the program window as an icon with the photo icon symbol.
- Photo transfer has been configured, NEF and JPG files will be saved on the camera's memory card, but only the JPG files that are used by Tether Display will be copied to the computer, which will shorten the transfer time.
- If you want to use RAW files, you can enable their support. Check out the section: Application settings.
- Additionally, you can control your camera from this application and release the shutter.
Minimize digiCamControl window and go to the Starting the Tether Display section.
Wireless Transmitter Utility
- Download and install Nikon Wireless Transmitter Utility from this site: https://downloadcenter.nikonimglib.com/en/download/sw/179.html
- Connect the camera to the computer via Wi-Fi using the Wireless Transmitter Utility instruction manual or use the video tutorial: https://www.youtube.com/watch?v=xujekkY7b5U (skip the section of the video about uploading selected photos).
- On the Nikon camera, select the NEF + JPEG basic saving format. Set the JPEG size to medium or small. Additionally, you can check in the manual of the camera how big photos your camera records for the JPEG M. option. If it is more than 12Mpix, choose the small option, which will reduce the resolution and the transfer to the computer will be faster.
- Additionally, in the camera menu in Connect to PC - Options section turn on Auto Send and set JPEG value in Send File As.
- By default, the Wireless Transmitter Utility creates several subfolders in the destination directory that you have specified for saving photos. Take a test photo and see in which subfolder the photo is saved. The path to the photo subfolder will be the one you need to set in the Tether Display.
- Photo transfer has been configured, NEF and JPG files will be saved on the camera's memory card, but only the JPG files that are used by Tether Display will be copied to the computer, which will shorten the transfer time.
- If you want to use RAW files, you can enable their support. Check out the section: Application settings.
Minimize digiCamControl window and go to the Starting the Tether Display section.
airnef
- Download and install airnef from this site: http://www.testcams.com/airnef/
- Connect to the camera wirelessly using Wi-Fi. Check the camera manual how to set up such a connection with a computer.
- On the Nikon camera, select the NEF + JPEG basic saving format. Set the JPEG size to medium or small.
- Download the ZIP package containing a script to facilitate the launch of airnef: airnef script
- Unzip the downloaded ZIP package, run the airnef_start.bat file and follow the instructions on the screen.
- Take a test photo. The newly taken photo should after a moment appear in the destination directory selected when running the above-mentioned script.
Minimize airnef window and go to the Starting the Tether Display section.
FujiFilm X Acquire
- Download and install FujiFilm X Acquire from this site: https://www.fujifilm-x.com/global/products/software/x-acquire/
- Connect your camera to your computer via USB or Wi-Fi using your camera's instructions.
- Set the camera to tethering mode, e.g. PC SHOOT AUTO.
- Launch the FujiFilm X Acquire application and go to the Specific destination folder... menu. Select the directory where you want to save your photos.
- Go to the Preferences... menu. In the Specify the formats to be transferred to PC section, select JPEG.
- In the Specify the formats to be saved onto the camera's memory card section, select RAW.
- Photo transfer has been configured. RAW files will be saved to the camera's memory card, and JPG files used by Tether Display will be copied to the computer, reducing transfer time.
- If you want to use RAW files, you can enable their support. Check out the section: Application settings.
Minimize digiCamControl window and go to the Starting the Tether Display section.
Imaging Edge
- Download and install Imaging Edge from this site: https://support.d-imaging.sony.co.jp/app/imagingedge
- On the Sony camera, select the RAW + JPEG saving format and set PC+Camera in the Setup - PC Remote Settings - Still Img. Save Dest. menu.
- In the Setup - PC Remote Settings - RAW+J PC Save Img menu, set: JPEG Only. RAW and JPG files will be saved on the camera's memory card, but only the JPG files that are used by Tether Display will be copied to the computer, which will shorten the transfer time.
- Connect the camera to the computer with a USB cable. If your camera has built-in Wi-Fi support and supports wireless tethering (check the table), you can connect to Imaging Edge wirelessly. Check the camera manual to set up the connection.
- Launch the Remote module from Imaging Edge.
- In save folder panel enter the path of the directory where you want to save images.
- Select Tools - Settings from the menu and in the Preview tab uncheck the Display preview in Viewer box.
- Take a test photo. The newly taken photo should after a moment appear in the destination directory.
- If you want to use RAW files, you can enable their support. Check out the section: Application settings.
- Additionally, you can control your camera from this application and release the shutter.
Minimize Imaging Edge window and go to the Starting the Tether Display section.
Starting the Tether Display
- After connecting the camera and configuring tethering using one of the above programs, launch the Tether Display - control panel shortcut from your computer desktop.
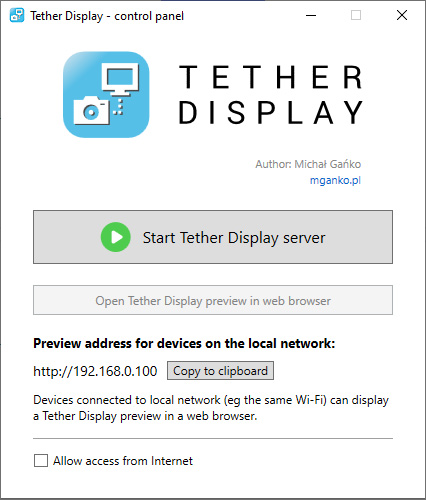
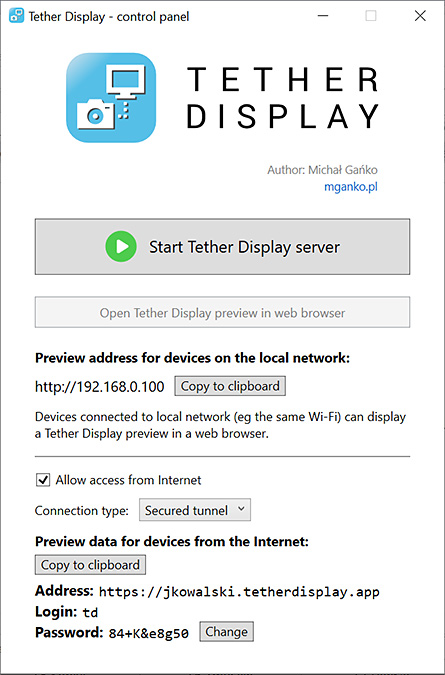
- Start the Tether Display server by clicking Start Tether Display server.
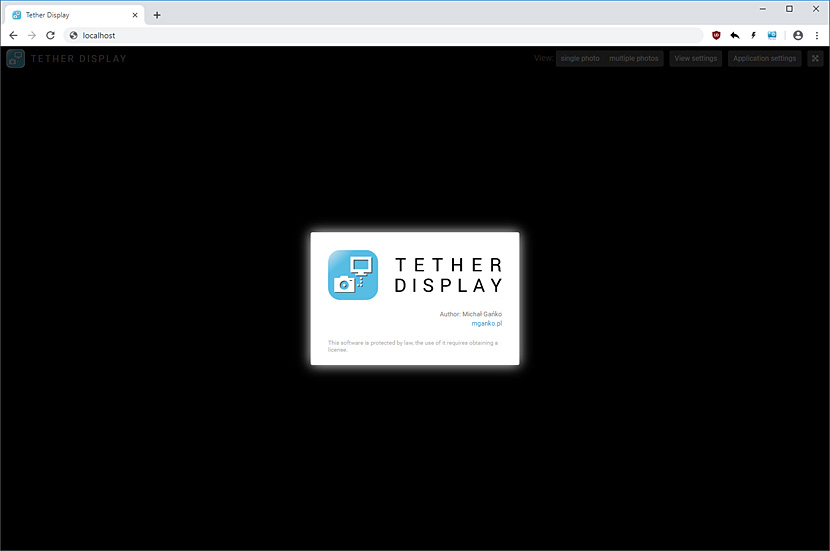
- Click Open Tether Display preview in web browser. A default web browser will be launched in which a page with photo preview will be displayed.
- Enter the application settings by clicking the button in the top right corner and in the Path to photos directory field enter the path of the directory that you set in the previously configured program. Scroll down the window and accept the settings by clicking the OK button.

These settings are only available from the computer where Tether Display is installed. Other devices on which the preview is open can not change these settings. You can read more about the application settings here.
That's all, the application is running and will display photos that will appear in the set directory.
Now you can open photo preview page on other devices that are on the local network by opening the web address which you will find in the control panel. Additionally, you can open a preview via the Internet if you have selected this option. Read more about Internet access in the section: Internet access.
Read about interface description and configuration options.
Internet access
Tether Display allows you to share access over the Internet.
Select the option Allow access from Internet in the application control panel, select the connection type: secured tunnel, and then start the server.
Below the selected option, information about the address and access data will be available.
That's it, Internet access now works!
On the computer where the Tether Display is installed, you can check what devices are currently connected to the photo preview. Read more in the interface description section: Connected devices.
The alternative connection type: direct connection is intended for advanced users and requires additional configuration of the Internet access device for proper operation of the Internet preview. A public IP address is also required (check with your ISP).
Log in to your network device (router) and configure port forwarding according to the instructions below. The designation of the configuration fields may differ depending on the network device model.
- IP address LAN: IP address of your computer
- External port: 80
- Local port: 80
- Protocol: TCP
Interface description
Control panel
The Tether Display control panel is used to start and stop the application server.
Description of window elements:
Start Tether Display server - starts the server service. After starting the server, this button is used to stop it. Closing the control panel window does not stop the server. It is always recommended to stop the server after the work is finished. The server will also be stopped automatically after restarting the computer.
Open Tether Display preview in your browser - opens the default browser with photo preview. On the computer desktop you will find shortcuts that you can also launch the preview by directly selecting the type of view.
Preview address for devices on the local network - you can open a preview page on devices that are on the local network as the computer. Use any web browser by entering the address in it.
Allow access from Internet - this option allows you to share photos preview via the Internet. Read more in the section: Internet access.
After selecting this option, information will be available: at what address the preview is located, and access data to it.
Preview in Tether Display
This is a web application for viewing photos. It is launched in the web browser at http://localhost address from the computer where Tether Display is installed. On other devices from the local network (e.g. Wi-Fi) the address provided in the Tether Display control panel. After enabling the Allow access from Internet option in the control panel, users from the Internet can start the preview at the address indicated in the panel.
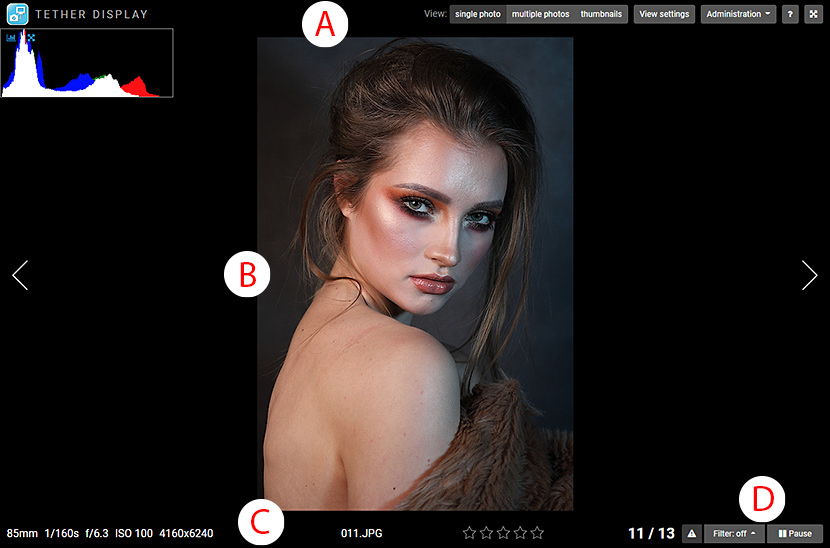
A - upper bar with setting buttons and full screen button
B - area displaying a photo or photos
C - the bottom bar, depending on the type of view selected, displays, for example, details of the photo
D - button to filter photos by rating and pause the live mode

View - choosing the type of view (one photo, multiple photos, thumbnails).
View settings - settings of the current view. Changing these settings will apply only to the current tab in the browser on which the preview was opened.
Device groups - in the drop-down menu at View settings; enables joint control of devices from the local network. See the Device groups section for more details. This element is only available from the computer on which the Tether Display is installed or from the local network if so set.
Administration - drop-down box with options: Application settings, Connected devices and Remote control config. You can find more about these options in the section: Application settings, Connected devices, Photo rating list and Remote control. Administration element is only available from the computer on which the Tether Display is installed.
Help button - displays tips and keyboard shortcuts.
Full screen button - button for switching the browser to full screen mode and back.

Filter - filtering photos by rating
Pause - enables / disables pause (app automatically sets the newest photo as active by default)
In single photo and multiple photos view:
Double clicking on the photo will display it on all other devices on which the preview is open. This feature is especially useful when you want to pay attention to the selected photo to others viewers.
Holding the right mouse button down or touching and holding (on mobile devices) in the photo it will be zoomed in.
Below are descriptions of particular types of views.
View: single photo
This view displays a single photo with the necessary details:
- histogram
- overexposed parts of image
- crop guides
- details about photo
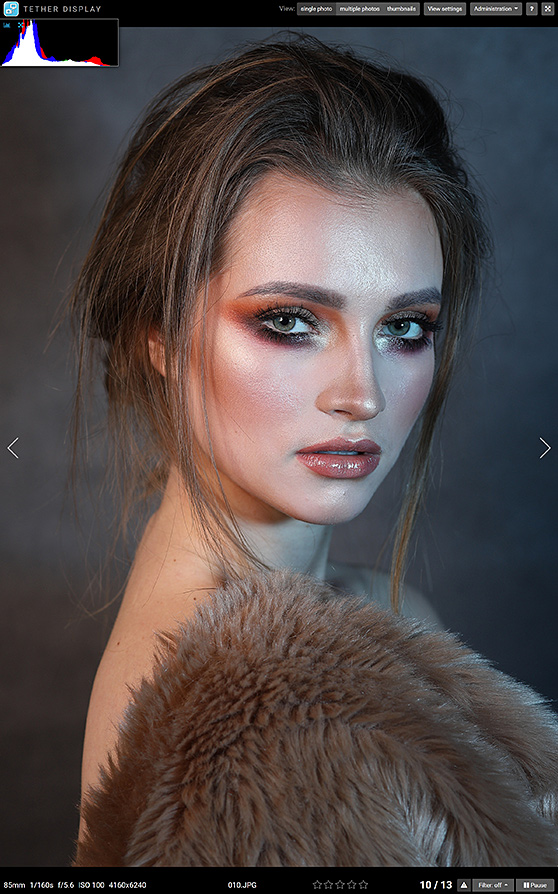
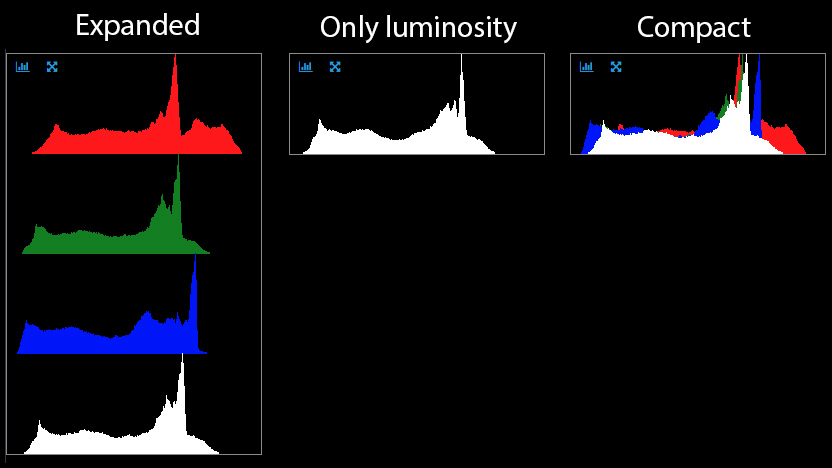
Histogram
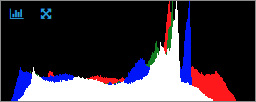
By default, it is displayed in the upper left corner. You can change its position using the  button or hide it by clicking on
  . The histogram can be displayed in one of three variants (set in the application settings):
Overexposed parts of image
By default, the application highlights the overexposed parts of the image in red.
You can disable this function by clicking  or using the O keyboard shortcut. You can change the overexposed threshold in the application settings.

Crop guides
Allows you to overlay crop guide lines on the photo in a selected aspect ratio (e.g., 1:1, 5:4, 4:3, 16:9), making it easier to evaluate the composition before final cropping. Using the Crop preview alignment point option, you can specify which part of the image (center or edges) the crop lines should be aligned to.
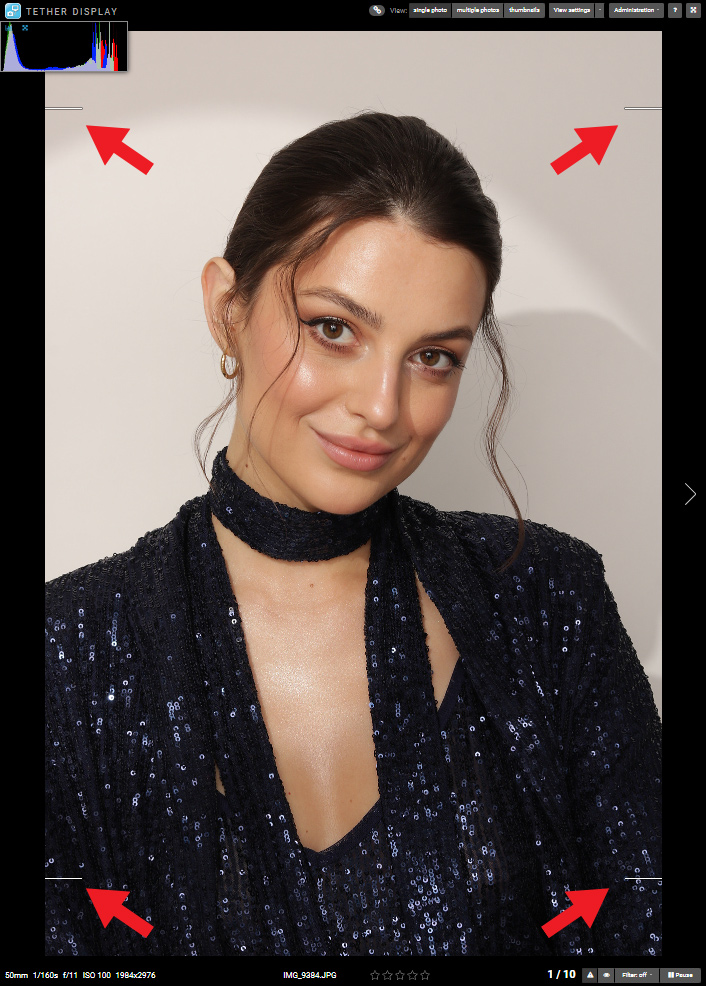
Details about the photo are displayed at the very bottom. From the left: focal length, shutter speed, aperture value, ISO value, resolution, name of the photo, rating that you can change by clicking on the stars, number of the active photo and the number of all images.

View: multiple photos
This view displays several photos arranged side by side.
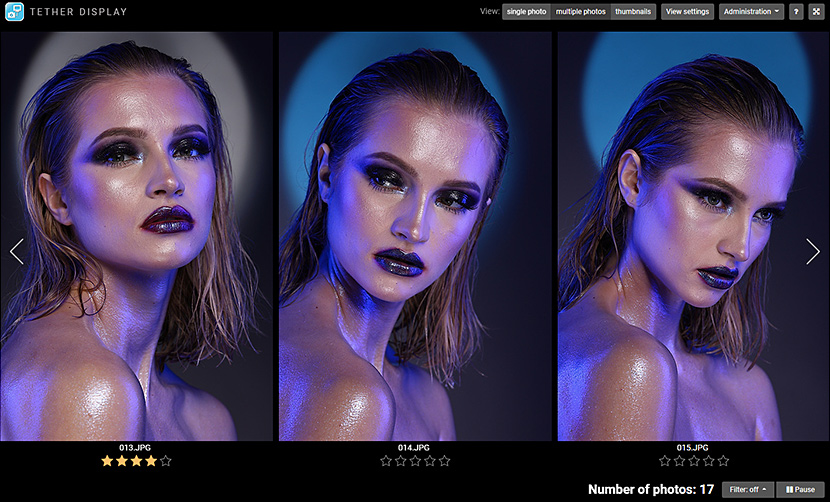
Depending on the settings that you can change in the application settings or in the view settings, this view can display the most recent photo on the right or left side of the screen and arrange it from left to right or vice versa.
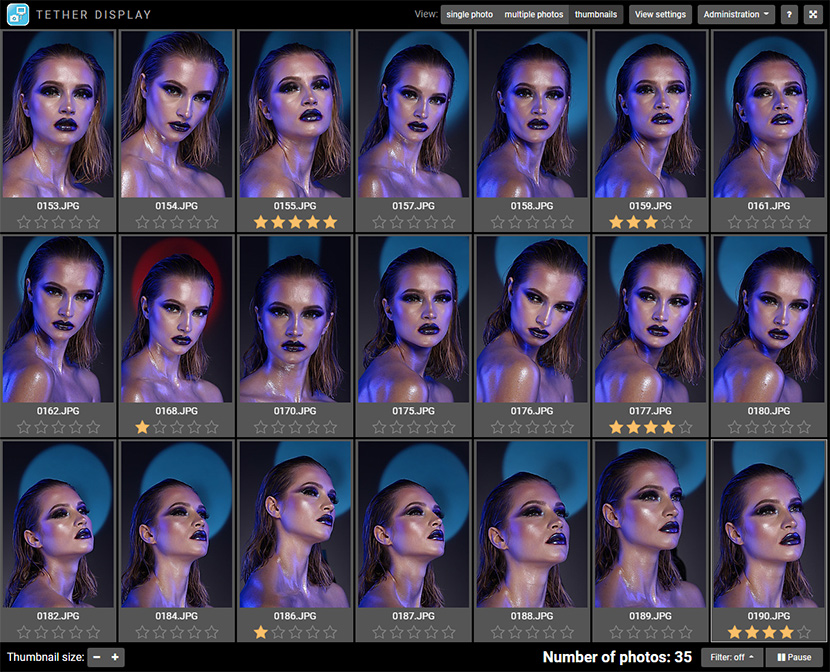
View: thumbnails
In this view, photos are displayed as thumbnails.
In the settings you can change their size and ratio of the sides to better match the type of photos. In addition, you can change the size of the thumbnails using the buttons in the lower left corner of the screen.
Clicking on the selected thumbnail will change the view to single photo. In the case of another tab on this device, the single photo or multiple photos view is open, then the photo will be displayed in this view.
Device groups
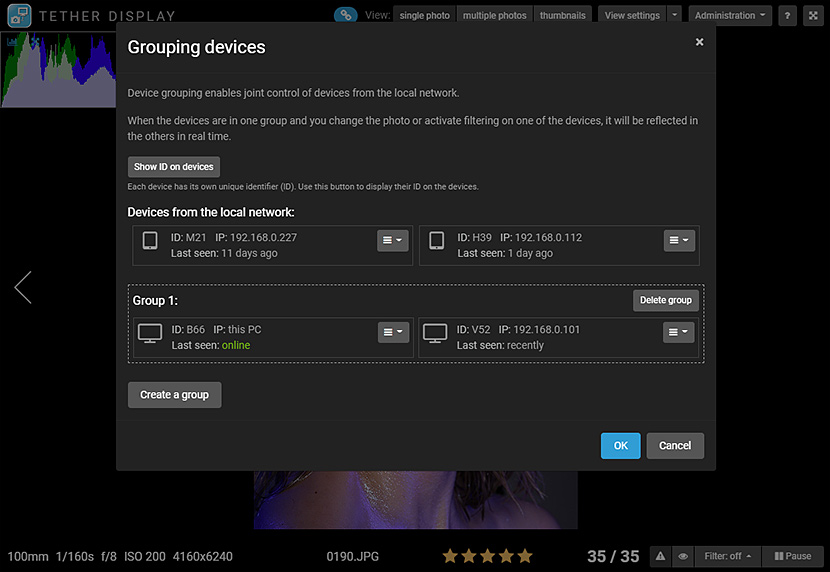
Device grouping enables joint control of devices from the local network.
When the devices are in one group and you change the photo or activate filtering on one of the devices, it will be reflected in the others in real time.
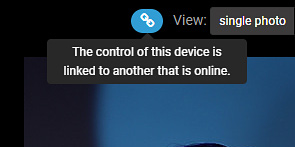
When the device is in a group, the icon appears at the top of the screen. When you hover the cursor over it, you can check if other devices in the group are online.
By default, device groups can only be managed from the computer with the Tether Display application installed. In the application settings, you can allow management from all devices from the local network.
Viewing active photo
Each view can be configured to display the latest photo as active or one in relation to the newest one (offset), e.g. the penultimate photo.
This feature is useful when using multiple monitors or even devices. For example, one monitor displays single photo view, and second monitor multiple photoss view. The new photo will be displayed in the single photo view on first monitor, and in the multiple photos on second monitor active will be the last but one. This way, monitors or devices do not display the same image twice.
Using these options, you can configure the preview in an unlimited number of ways.
Examples of use:
The monitor on the right displays the current photo and the monitor on the left 3 previous (offset -1).
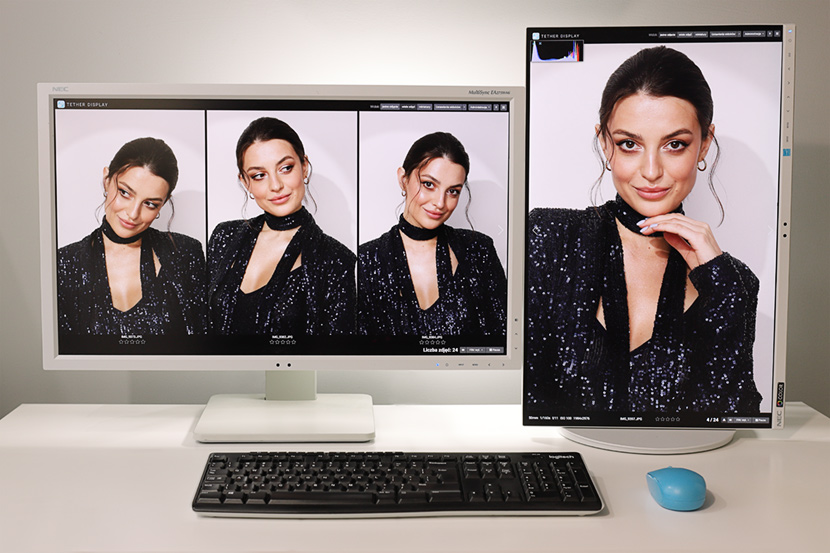
Computer with two monitors; the monitor on the left displays the current photo, the monitor on the right the last but one (offset -1). The tablet displays the multiple photos view with offset -2 set so that it displays subsequent photos.The computer and the tablet are in one group of devices, thanks to which their control is connected. When you change a photo on your computer, it changes on your tablet in real time, and vice versa.
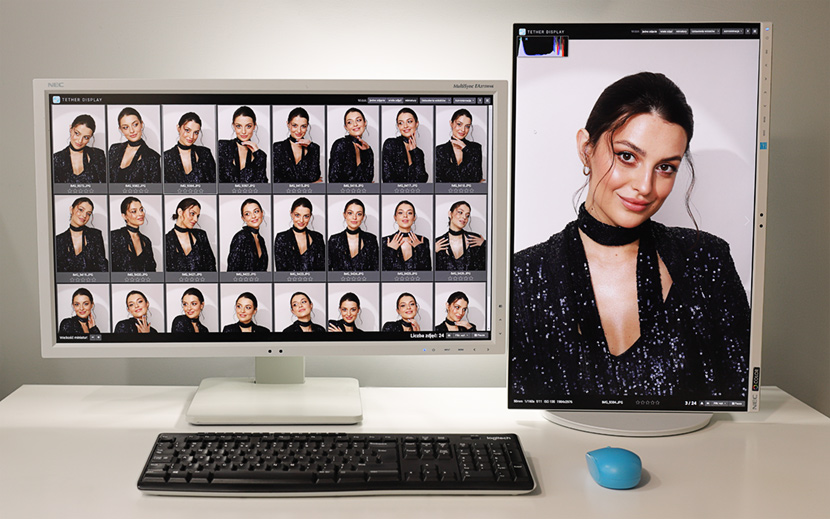
The right monitor displays single photo view and left monitor thumbnails view.
Keyboard shortcuts
Global:
Single photo and multiple photos view:
Up
Down
Single photo view:
Thumbnails view:
Up
Down
Application settings
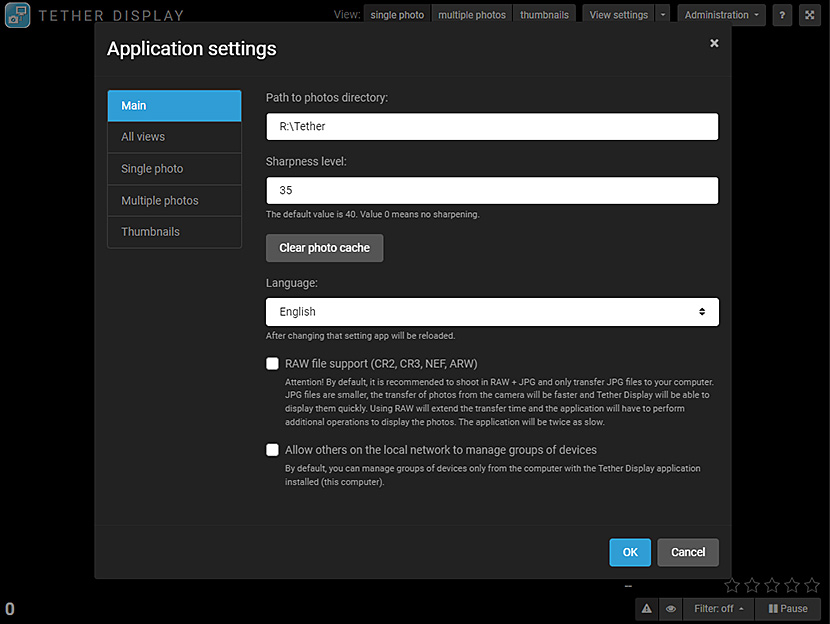
Path to photos directory - directory path from which Tether Display will lad photos.
Sharpness level - additional sharpening that will be applied to the displayed photos.
As the author of the application and a beauty photographer, I prefer sharpening photos while watching them when they are unretouched. You can turn off sharpening by entering the value 0 in this field.
Clear photo cache - the application during work generates temporary image files in various resolutions suitable for devices on which currently are browsed. For example, for 500 photos (from camera with 26mpx) viewed on two devices (computer and tablet) the required free space on the disk is 6GB. These files are automatically deleted when Path to photos directory is changed to another one or you can clear them at any time by clicking this button.
Language - app language
Allow others on the local network to manage groups of devices - see the Device groups section for more details.
RAW file support - by default, it is recommended to shoot in RAW + JPG and only transfer JPG files to your computer. JPG files are smaller, the transfer of photos from the camera will be faster and Tether Display will be able to display them quickly. Using RAW will extend the transfer time and the application will have to perform additional operations to display the photos. The application will be slower.
RAW files from cameras are supported: Canon, Nikon, Sony, FujiFilm.
Default settings for views are described in the section with descriptions of views.
Connected devices
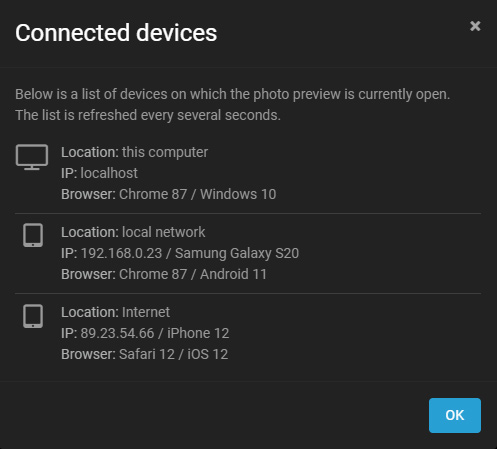
Photo rating list
Remote control
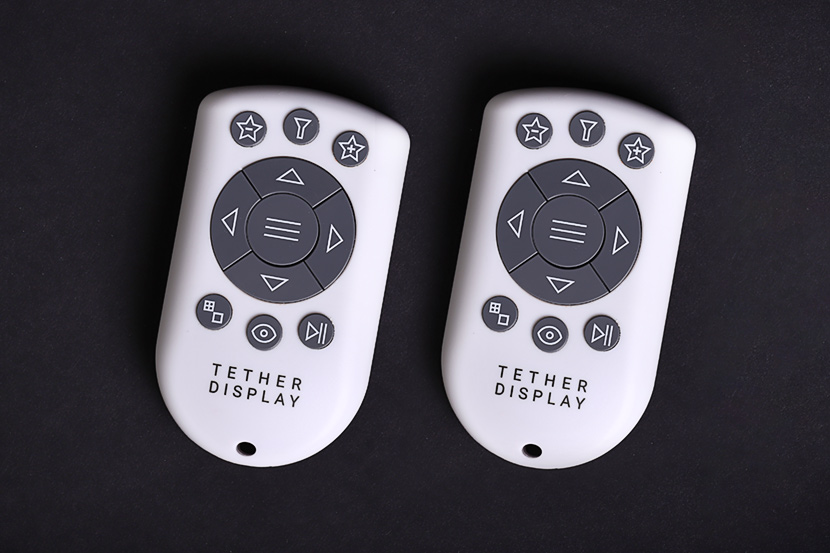
It is a wireless device that allows you to control all the necessary functions of the Tether Display preview.
In addition, thanks to it, you can automate various tasks on the computer, e.g. connect to the camera via WIFI with one button, run any application, etc. without closing the photo preview.
Device description

Remote functions
 - change of active photo; jump by 5 photos forward or backward
 - open menu of the current view
 - increase / decrease rating of the active photo
 - enable / disable filtering by any rating;
 - switch view to thumbnails or previously used
 - display active photo on all other devices on which the preview is open; long press the button will display the battery level of the remote control
 - pause / live (automatically sets the newest photo as active)
Task automation
The remote control allows you to run 3 different tasks / scripts on your Windows computer.
To use this functionality, the application control panel must be running all the time to listen for commands from the remote control. There are 3 files with the BAT extension in the Tether Display installation directory in the tasks folder. BAT files allow you to run various commands, programs, scripts in Windows.
Long press of one of the buttons: 
 will run the appropriate BAT file: task1.bat, task2.bat or task3.bat.
You can freely change the content of these files and automate various tasks on the computer, e.g. start a connection with the camera via WIFI, start applications, control music, and many more without having to close the photo preview.
BAT files can be renamed freely, but they must start with task1, task2, task3. For example, the correct filename is: task1-connect.bat or task2-myscript.bat
If you want to run BAT files on a different computer than the one on which Tether Display is installed, copy the RemoteControlTasks.exe file along with the tasks directory that you will find in the program installation directory. This program listens for commands from the remote control as well as the previously mentioned control panel and runs BAT files.
Receiver requirements
The Tether Display remote control receiver can work with any device on which the preview of photos from the Tether Display application is displayed: computer, smartphone, tablet, smart TV; with any operating system: Windows, macOS, Linux, Android, iOS.
When there are devices connected to the USB 3.0 port near the receiver, they may interfere with its operation.
To get the best possible range, the receiver should be moved away from other devices, you can additionally use a standard USB extension cable.
Installation and use
- Set the channel of the receiver and pair the remote control with it according to the procedure in the manual.
- Connect the receiver to a computer / device that displays Tether Display.
- When pressing buttons on the remote control, a flashing green light indicates that the receiver has received the command, and a red light that it is out of range.
Communication channel
Remote control can work on 1 of 15 channels. In order for the transmitter to work with the receiver, it must be paired with it (set to the same channel as the receiver).
You can set up several remote controls to work with one receiver. Nearby receivers should operate on different channels.
Channels 1 to 9 operate on the same frequencies as the WiFi network, and channels 10 to 15 outside the WiFi network.
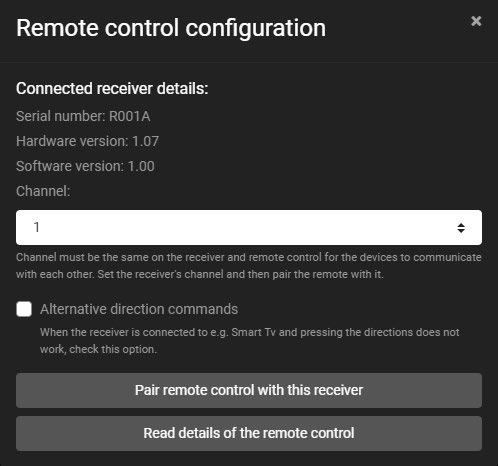
Setting communication channel with the Tether Display application:
Connect the receiver to the computer where the Tether Display application is installed.
Select Administration - Remote control config from the top menu.
Follow the on-screen instructions. Here you can set the receiver channel, pair the remote and read its details.
Alternative method for channel setting and remote pairing:
There is an alternative method to set the receiver channel and pairing the remote control that does not require connecting the receiver to a computer with the Tether Display program installed.
Setting the receiver channel:
- Using a paper clip, press the button in the small hole on the front of the receiver (above the text Tether Display) 5 times in quick succession.
- The receiver's channel will be changed to the next one from the current one, and the indicator light will flash as many times as the channel number is set.
- Pressing the button 5 times again changes the channel to the next one or 1st when the last setting was 15.
Pairing the remote with the receiver:
- Using a paperclip, press and hold the button in the small hole on the front of the receiver (above the text Tether Display) for 3 seconds. The indicator light will turn on steadily.
- Within 8 seconds, press and hold button on the remote control.
- Correct pairing of the remote control with the receiver will be confirmed by two flashes of the indicator on the receiver.
Checking battery level
Press and hold button.
On the device to which the receiver is connected, a message with the battery level will be displayed in the Tether Display photo view.
Additionally, when the battery level of the remote control drops below 20%, a low battery message will be displayed regularly during its use.
Battry charging
Use the included charging cable. Connect the narrow plug to the socket on the bottom of the remote control, and the USB plug to a USB socket on a computer or a USB power adapter.
red light will illuminate next to the charging socket to indicate the charging process (make sure the remote control is turned on). The indicator light will turn off when the remote control is fully charged. While charging, the device does not transmit and cannot be used.
Approximate charging time for a fully discharged battery is approximately 3 hours. It is not recommended to leave the device connected with the charging cable for an extended period of time.
Technical data
Transmission frequency: 2,4 - 2,5 GHz
Range: 15 m indoors, 40 m outdoors
Number of channels: 15
Battery life: 3 months (depending on use)
Transmitter charging socket: 2,5 x 0,7mm
Transmitter dimensions / weight: 48x85x16mm / 40 g
Receiver dimensions and weight: 68x23x9mm / 12 g
How to download the application
The use of the Tether Display application requires a license. For details, write to me: kontakt@mganko.pl
Version history
1.14
- added crop preview option
- fixes and optimization
1.13
- added support for RAW files from FujiFilm cameras
- fixes and optimization
1.12
- bug fixes and optimization
1.11
- RAW file support added (Canon, Nikon, Sony)
- added secured tunnel as Internet access connection type
- bug fixes and optimization
1.10
- bug fixes and optimization
1.09
- added the ability to group devices so that their control is linked
- bug fixes and optimization
1.08
- added support for Tether display remote control, now you can use the remote control to control all the necessary functions while previewing photos
- changes in histogram generation algorithm
- bug fixes and optimization
1.07
- fixed a bug that caused the last file name to be incorrectly saved in the list of rated photos
- new keyboard shortcuts have been added (filtering, switch view to thumbnails or previously used)
- other minor fixes
1.06
- adjusted the panning animation in the multiple photos view to work better in Chrome 88
- fixed an issue where the selected photo could not be displayed on all devices at the same time
- other minor fixes
1.05
- added a pause button to pause the setting of the most recent photo as active
- added the option of rating photos with the function of exporting a list of rated photos to programs: Lightroom, Capture One, Total Commander, Photo Selector
- the ability to filter photos according to a specific rating
- bug fixes and optimization
1.04
- sharing photo preview via the Internet
- added file name display in multiple photos view
1.03
- new setting Set the latest photo as active
- support for presentation remote controls for navigation between photos
- bug fixes and performance optimization
1.02
- new "thumbnails" view added
- settings useful for displaying photos on many devices at the same time were expanded
- help window added
1.01
- bug fixes and performance optimization
1.00
- initial version of Tether Display